BLOGPOST: DIY Halloween Mason Jar Luminaries
It’s exactly 3 more weeks until Halloween, and I tweeted earlier this week about how it doesn’t feel like autumn here in Los Angeles. Since I grew up in New Jersey, I’m used to the weather feeling colder and the leaves changing color. In LA, it’s basically summer all year round. Not complaining! But I definitely miss the seasonal changes that comes with living on the east coast.
It doesn't feel like autumn in LA, so I've been compensating by putting pumpkin spice on everything I own. 🎃 pic.twitter.com/BnCMEBPzIY
— Katelyn Darrow (@KatelynDarrow) October 6, 2016
In an attempt to be festive for Halloween, I decided to decorate my apartment and make some Halloween-themed mason jar luminaries. I think they turned out pretty cute, so I wanted to make a DIY post for anyone else feeling crafty! I’m definitely not the most artistic person, so trust me when I say this is extremely easy to make! (You’re literally just decorating a mason jar — it doesn’t get much simpler than that).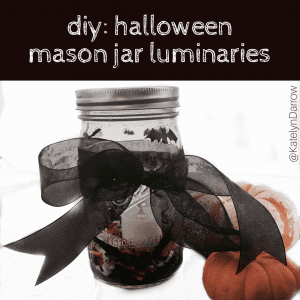

WHAT YOU’LL NEED
–Mason Jars: I decided to use two different sizes, so you can mix and match accordingly.
–Rubbing alcohol: Rubbing alcohol (or white vinegar) should be dabbed on the glass before you start painting.
–Acrylic paint: Paint a Halloween design onto your mason jar!
–Stickers, ribbon, and decorative material: Any materials you plan on using to decorate the mason jar with. Be creative!
–Hot glue gun: Hot glue is a strong reinforcement for securing ribbons, buttons, googly eyes, etc.
–Mod Podge: Painting a layer of Mod Podge over your paint or stickers will help set and seal the design. It dries clear, so don’t worry about it interfering with your decorations.
–Tea light candle: Put a tea light candle in the bottom of your mason jar to make it a luminary! Of course, you can always use this DIY for a different purpose, like a pencil holder or small flower vase. I decided to go with an artificial, battery-operated candle because I added flammable material to the inside of my mason jar.
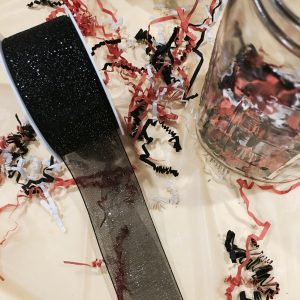
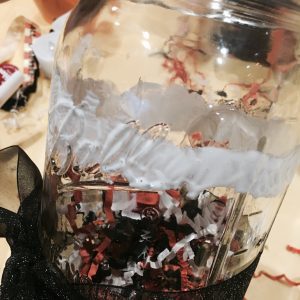
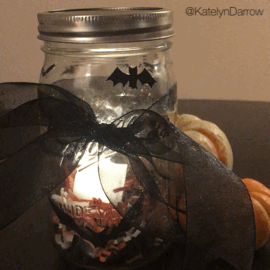
–Moss or confetti (optional) / I used both floral moss and paper confetti in the bottom of the jars. You can’t see the moss through the painted jar, but the colored confetti is visible in the clear jar and adds a decorative aspect. If you are adding something flammable to the inside of the jar, be sure to use a fake, battery-operated candle.

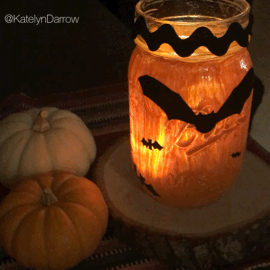
I decorated two jars that ended up looking very different from one another. The first jar I decided to paint entirely orange, whereas I left my second jar clear.
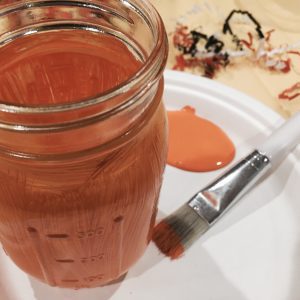
If you plan on painting, the very first thing you need to do is prep your glass. You can do this with either rubbing alcohol or white vinegar by dabbing a little onto a paper towel. After you wipe down the glass, you’re ready to paint! I stuck to a simple, orange coating and painted three layers over the glass (plus a layer of Mod Podge, so the paint wouldn’t chip). Having multiple layers of the same color helped add intensity and also prevented excessive streakiness. My paint still ended up a tad bit streaky, so in retrospect, I probably should have used a different tool for application. Maybe a sponge, rather than a paintbrush? It’s all a learning experience, I suppose! When it comes to “mistakes”, I’ll just tell people it was an intentional artist choice. 😉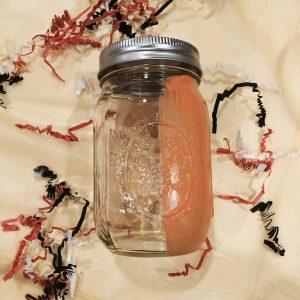
After my paint dried, I added a ribbon on top and disposed of the metal tin top. If you decide to put a ribbon directly around the top of the jar, you unfortunately won’t be able to put the lid back on. I recommend using a hot glue gun for securing your ribbon.
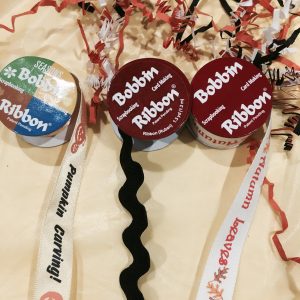
My second, paintless jar was looking very plain so I decided to decorate it with ribbons. I layered two different ribbons, and really love how it came out. First, I made a thick, black sparkly ribbon into a bow and attached that. I actually used Mod Podge to attach the ribbon to the glass (as Mod Podge is simply just glue and water). Hot glue would have been better for this, but I was limited on supplies (Shhhhh, it was an “intentional artist choice”). Then, I put a thinner, colored ribbon contrasted over the black. Again, I used Mod Podge to attach the ribbons. It seems to be holding up okay! (But to reiterate, if you have a hot glue gun I would use that to attach any external items to the jar).

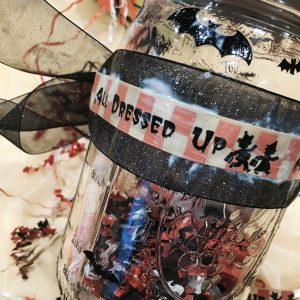
After that, I added Halloween stickers. I still felt like there was a lot of empty space, so the bat stickers added a nice touch. I ended with a layer of Mod Podge over the stickers to ensure they would stay in place and wouldn’t peel off at a later time.
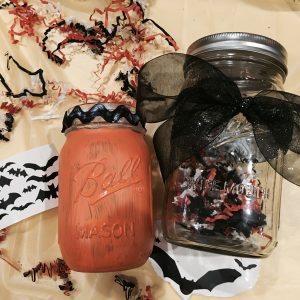

I’m using my decorated mason jar as a luminary or candle holder, but you could also use it as a flower vase, pencil holder, candy jar, etc. I added two artificial, flickering tea light candles. Although I prefer the effect of a real candle, I decided to stick to a fake one because I put flammable confetti and moss inside, and I would very much like to avoid a fire.
This is such an easy, fun idea! It adds Halloween spirit to my living space, and definitely makes it feel more like autumn. (despite the palm trees and warm weather). Much love, and thanks for reading!
October 10, 2016 @ 4:27 pm
I think my boys would love this. Thanks for sharing it Katelyn.
October 10, 2016 @ 6:28 pm
Love this idea!